User Authentication With Springboot using local database
This post explains how to configure the spring security for your app to support user authentication using local database.
Introduction
In Spring Boot, there is no plug-and-play like other frameworks. To get the user authentication working, you need to write some code to glue the required components working together. Spring Security was designed to be flexible with multiple authentication/authorization strategies.
Overview design
Servlet Filter chains
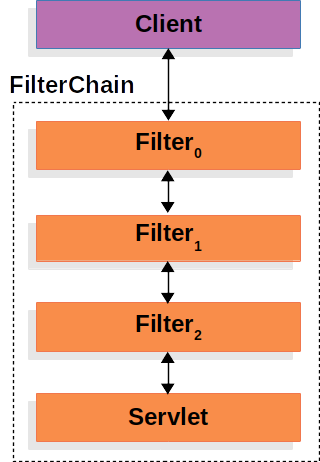
source from SpringIO
Here is an example of configuring the security filter
@Configuration
@EnableWebSecurity
public class SecurityConfig {

    @Bean
    public SecurityFilterChain filterChain(HttpSecurity httpSecurity) throws Exception {
        return httpSecurity
                .authorizeHttpRequests(authorize -> authorize
                        .requestMatchers("/demo/default")
                        .permitAll()
                        .anyRequest()
                        .authenticated()
                ).csrf(AbstractHttpConfigurer::disable)
                .httpBasic(Customizer.withDefaults())
                .build();
    }

}
With this security configuration, the application permits unrestricted access to the “/demo/default” path, while other paths require basic authentication. By specifying httpBasic configuration, it expects the Authorization header alongside the Basic authentication strategy, adhering to the format Basic xxxxx.
Create custom implementation of UserDetailsService interface
This service is the core service to load the user information, this has an abstract method to load the user by username (loadUserByUsername). The service is a dependency of DaoAuthenticationProvider, which handles the authentication logic.
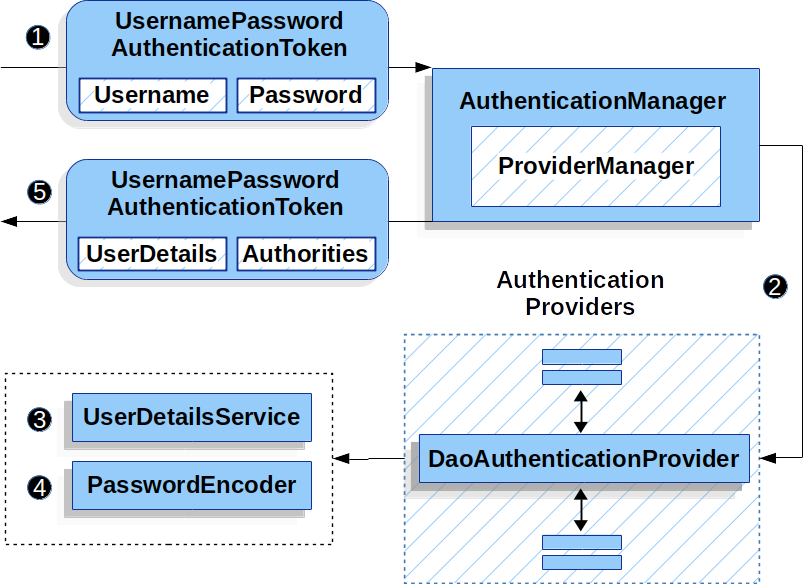
The Spring documentation provides a detailed explanation of how these components are interconnected to execute the authentication logic using username and password.
By implementing the UserDetailsService, we can specify how SpringSecurity will fetch the user information from the local database.
@Service
public class CustomUserDetailsService implements UserDetailsService {

    private final AccountRepository accountRepository;

    public CustomUserDetailsService(AccountRepository accountRepository) {
        this.accountRepository = accountRepository;
    }

    @Override
    public UserDetails loadUserByUsername(String email) throws UsernameNotFoundException {
        Account account = accountRepository.findByEmail(email);

        if (account == null) {
            throw new UsernameNotFoundException("account not found");
        }

        List<GrantedAuthority> grantedAuthorities = AuthorityUtils
                .createAuthorityList(account.getRoles().stream().map(Role::getName).toList());

        return UserDetailsImpl
                .builder()
                .id(account.getId())
                .email(account.getEmail())
                .password(account.getEncodedPassword())
                .enabled(account.getEnabled())
                .credentialsExpiredAt(account.getCredentialsExpiredAt())
                .expiredAt(account.getExpiredAt())
                .lockedAt(account.getLockedAt())
                .createdAt(account.getCreatedAt())
                .updatedAt(account.getUpdatedAt())
                .authorityList(grantedAuthorities)
                .build();
    }
}
The CustomUserDetailsService implements the UserDetailsService, which is an interface defined by SpringSecurity. It override the loadUserByUsername function by fetching the account using the repository.
After the account is found, the service builds the authorities list by looking at the roles association.
In this demo, the relationship between Account and Role is many-to-many, as an account can have many roles, and a role could be attached to multiple accounts. In SpringSecurity, beside roles, there are different terminologies for granted authorities, such as scopes and groups.
The UserDetailsImpl is a java class that implements the Spring UserDetails interface. The implement could look like following
@SuperBuilder
@AllArgsConstructor
public class UserDetailsImpl extends Account implements UserDetails {
    private List<GrantedAuthority> authorityList;

    @Override
    public Collection<? extends GrantedAuthority> getAuthorities() {
        return Collections.unmodifiableList(authorityList);
    }

    @Override
    public String getUsername() {
        return getEmail();
    }

    @Override
    public boolean isAccountNonExpired() {
        return getExpiredAt() == null || getExpiredAt().isBefore(Instant.now());
    }

    @Override
    public boolean isAccountNonLocked() {
        return getLockedAt() == null;
    }

    @Override
    public boolean isCredentialsNonExpired() {
        return getCredentialsExpiredAt() == null || getCredentialsExpiredAt().isBefore(Instant.now());
    }

    @Override
    public boolean isEnabled() {
        return getEnabled();
    }
}
In this implementation, I use some columns in the accounts table like expiredAt. In real project, these logic can be implemented differently based on the project requirements.
Encoded password
In Java, we can use PasswordEncoder to encode and check if the provided password is matched with the encoded password, here is a sample code to create the encoder and call its behaviors
    PasswordEncoder encoder = PasswordEncoderFactories.createDelegatingPasswordEncoder();
    String encodedPassword = encoder.encode("password"); // the value of encodedPassword is "{bcrypt}$2a$10$tBC.TeiMDcNt8rBHeqB6.eFg5Yb6HxlRy7RapEyxLM9ZEhV4fDZAq";
    String rawPassword = "password";

    boolean isMatched = encoder.matches(rawPassword, encodedPassword);
    assertTrue(isMatched);
Both encoding and decoding would require the password encoder, it is a good idea to define a bean for it. SpringSecurity looks for the bean automatically. Hence the full configuration would look like following
@Configuration
@EnableMethodSecurity()
public class SecConfiguration {
    @Bean
    public PasswordEncoder passwordEncoder(){
        return PasswordEncoderFactories.createDelegatingPasswordEncoder();
    }

    @Bean
    public SecurityFilterChain filterChain(HttpSecurity httpSecurity) throws Exception {
        return httpSecurity
                .authorizeHttpRequests(authorize -> authorize
                        .requestMatchers("/demo/default")
                        .permitAll()
                        .anyRequest()
                        .authenticated()
                ).csrf(AbstractHttpConfigurer::disable)
                .httpBasic(Customizer.withDefaults())
                .build();
    }
}
Controller
After configuring the entire authentication logic, we can finally create a controller to test if the code works correctly
@Conditional(IsDevEnvCondition.class)
@RestController
@RequestMapping("/demo")
public class DevAuthenticationController {
    private final SetupTestDataUsecase setupTestDataUsecase;

    public DevAuthenticationController(SetupTestDataUsecase setupTestDataUsecase) {
        this.setupTestDataUsecase = setupTestDataUsecase;
    }

    @GetMapping("/admin/dashboard")
    @PreAuthorize("hasRole('ADMIN')")
    public String showAdminDashboard() {
        return "Successfully access admin dashboard";
    }

    @GetMapping("/user/dashboard")
    @PreAuthorize("hasRole('USER')")
    public String showUserDashboard() {
        return "Successfully access User dashboard";
    }

    @GetMapping("/superadmin/dashboard")
    @PreAuthorize("hasRole('SUPER_ADMIN')")
    public String showSuperAdminDashboard() {
        return "Successfully access Super Admin dashboard";
    }

    @GetMapping("/default")
    public String showDefaultPage() {
        return "Without any authority, guest can see this page";
    }

    @PostMapping("/superadmin/run-me-first")
    @PreAuthorize("hasRole('SUPER_ADMIN')")
    public String runMeFirst() {
        return setupTestDataUsecase.execute();
    }
}
This DevAuthenticationController is only available in the dev environment by specifying the @Conditional(IsDevEnvCondition.class) annotation. This annotation is easy to write, I’d skip to talk about it to focus on the controller activities.
We need to run the /superadmin/run-me-first, this will create the test data. When starting the application, only the super admin account is created. We would need other roles to perform different tests, hence this endpoint helps to create other testing accounts.
The /default path accepts all traffics, there is no restriction on this path due to previous configuration on the SecConfiguration. Other path requires the basic authentication and sufficient role to access the content, for instance the /user/dashboard requires the account to have the USER role.
As mentioned earlier, an account could have multiple roles, the setupTestDataUsecase creates some test accounts with several roles attached:
    Account adminAccount = Account
            .builder()
            .email("admin@email.com")
            .password("password")
            .enabled(true)
            .roles(Set.of(adminRole))
            .build();

    Account multiRolesAccount1 = Account
            .builder()
            .email("multiroles1@email.com")
            .password("password")
            .enabled(true)
            .roles(Set.of(userRole, adminRole))
            .build();

    Account multiRolesAccount2 = Account
            .builder()
            .email("multiroles2@email.com")
            .password("password")
            .enabled(true)
            .roles(Set.of(userRole, superAdminRole))
            .build();
    //...
    accountRepository.saveAll(accounts);
Running the app
First, we can run the app in the Run mode, and use the http.request collection to test each endpoint (ensure to run the “/superadmin/run-me-first” first).
### Run this request first to setup testing data
POST {{ apiUrl }}/demo/superadmin/run-me-first
Authorization: {{ authorization_token }}
Accept: application/json
Content-Type: application/json

### /admin/dashboard returns 200
GET {{ apiUrl }}/demo/admin/dashboard
Authorization: Basic superadmin@email.com password
Accept: application/json
Content-Type: application/json

### /user/dashboard returns 200
GET {{ apiUrl }}/demo/user/dashboard
Authorization: Basic user@email.com password
Accept: application/json
Content-Type: application/json

### /user/dashboard with multi roles 1 returns 200
GET {{ apiUrl }}/demo/admin/dashboard
Authorization: Basic multiroles1@email.com password
Accept: application/json
Content-Type: application/json

### /user/dashboard with multi roles 1 result 403
GET {{ apiUrl }}/demo/superadmin/dashboard
Authorization: Basic multiroles1@email.com password
Accept: application/json
Content-Type: application/json

### /user/dashboard with multi roles 2
GET {{ apiUrl }}/demo/user/dashboard
Authorization: Basic multiroles2@email.com password
Accept: application/json
Content-Type: application/json

### /default no authorization required
GET {{ apiUrl }}/demo/default
Accept: application/json
Content-Type: application/json
After that, we could run the app in debugger mode, here are my breakpoints for your preferences
DaoAuthenticationProvider, functionretrieveUserandadditionalAuthenticationChecksSecurityExpressionRoot, functionhasRoleandhasAnyAuthorityName
Both classes mentioned here are located under SpringSecurity library, you can find them in the external libraries section, the path is org/springframework/security/authentication/dao/DaoAuthenticationProvider.class.
When sending the request from the http request above, the debugger stops at the DaoAuthenticationProvider#retrieveUser.
Since the UserDetailsService is a dependency of DaoAuthenticationProvider, we can check if our implementation for the CustomUserDetailsService#loadUserByUsername works correctly.
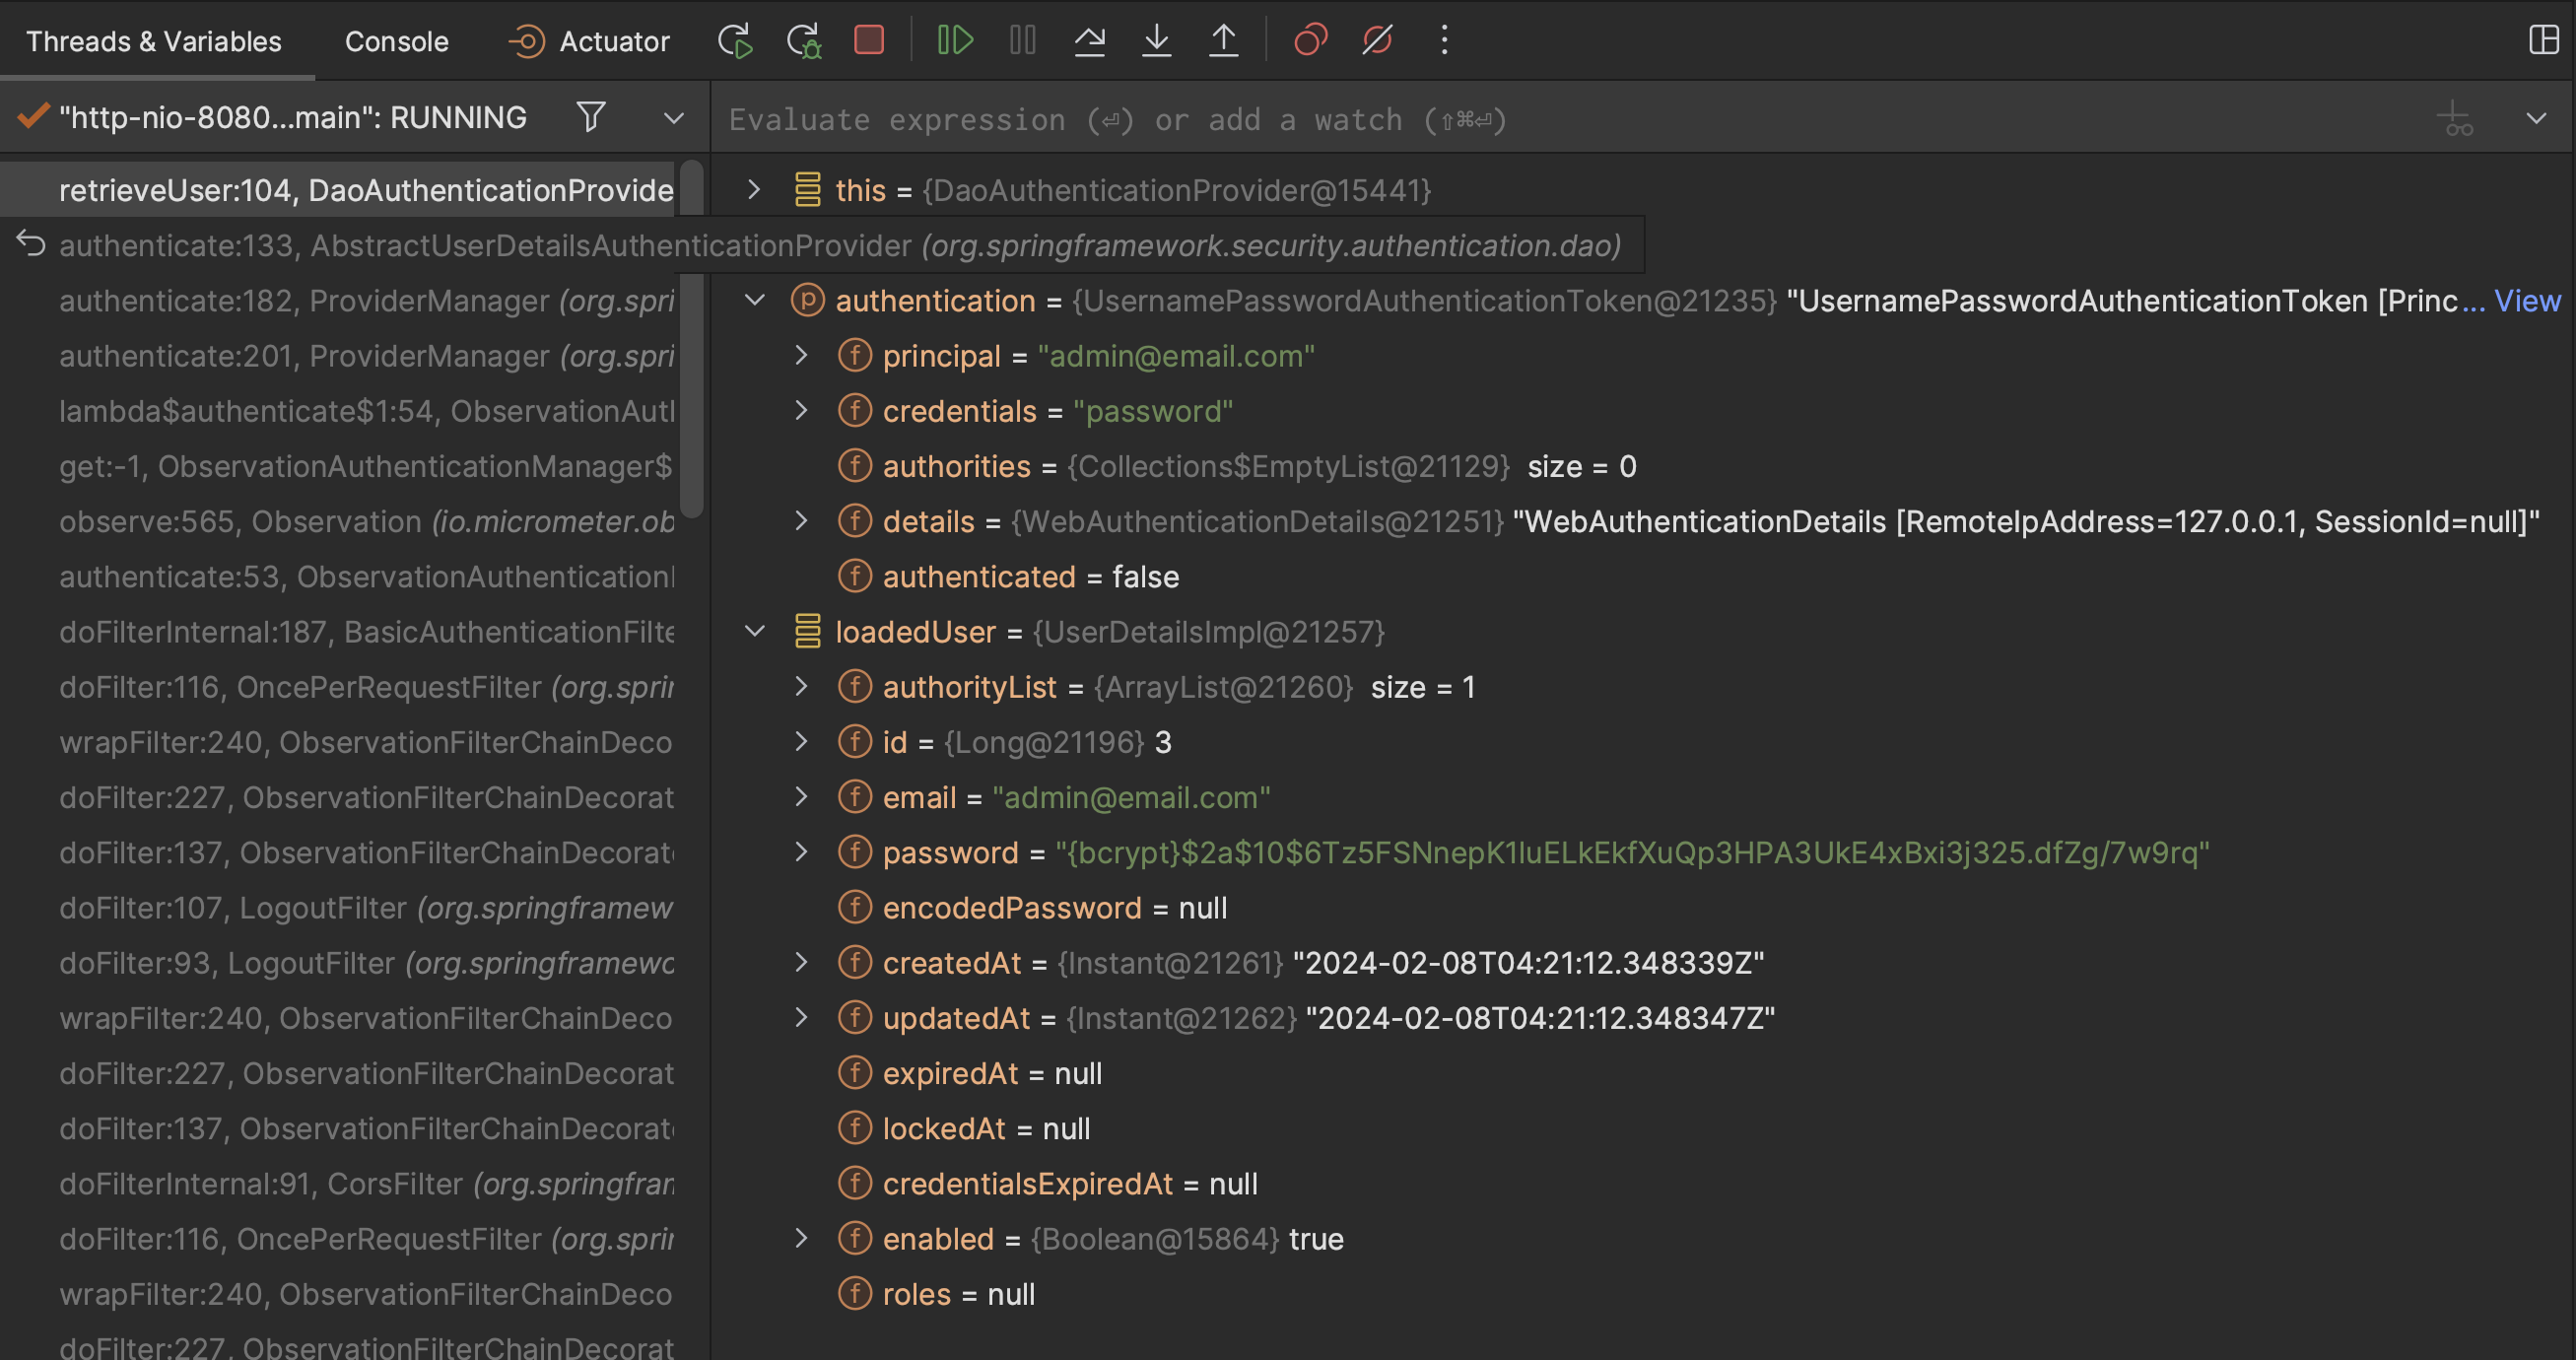
This screenshot shows a lot of useful information, for example the data type of the principal, credential, etc. which helps us to understand SpringSecurity better.
We also see the UserDetailsServices has been used in the DaoAuthenticationProvider and it returns the loadedUser in type UserDetailsImpl correctly from the database.
And this screenshot shows how the hasRole annotation works, this annotation is used in the controller to check if the principal has sufficient authority to access the endpoint.
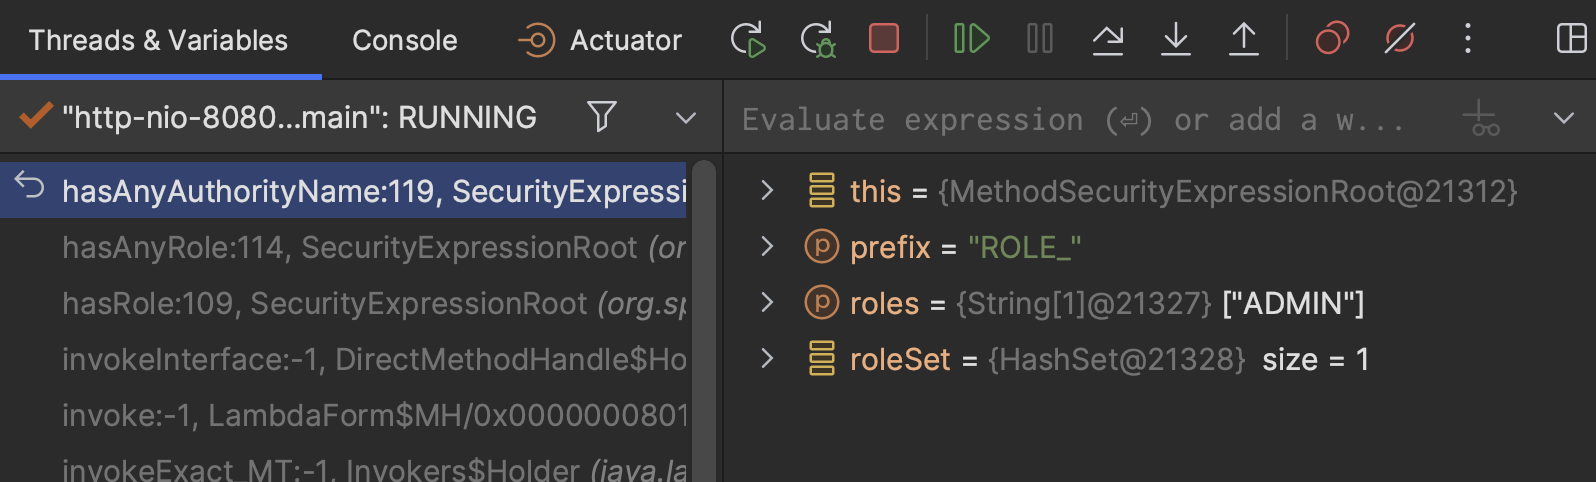
The code for the hasRole function is implemented in SpringSecurity as following:
@Override
public final boolean hasRole(String role) {
    return hasAnyRole(role);
}

@Override
public final boolean hasAnyRole(String... roles) {
    return hasAnyAuthorityName(this.defaultRolePrefix, roles);
}

private boolean hasAnyAuthorityName(String prefix, String... roles) {
    Set<String> roleSet = getAuthoritySet();

    for (String role : roles) {
        String defaultedRole = getRoleWithDefaultPrefix(prefix, role);
        if (roleSet.contains(defaultedRole)) {
            return true;
        }
    }

    return false;
}
This hasAnyAuthorityName invokes a utility function getRoleWithDefaultPrefix, that function takes the prefix (ROLE_) and appends the role value (loaded from the account roles table) to construct the defaultRole, hence the role value in database can omit the ROLE_ prefix.
Conclusion
This post is a short tutorial of how to connect the SpringSecurity with the local database credentials provider to authenticate and authorize the request. Through this post, my aim is to guide you how to navigate the SpringSecurity source code using debugger tool, which I believe is an invaluable method for gaining a deeper understanding of its design. By grasping the intricacies of its structure, not only does development become more streamlined, but troubleshooting also becomes significantly more efficient. The example repository can be found in Github.
Thanks for reading!